

CLIENT USER GUIDE
CONTENTS
1.0 How To Log In to OmniReturns Customer Facing Portal Admin 3
3.0 User & Retailer Management 5
4.0 Reporting & Returns Pending Review 7
How To Process A ‘Return Pending Review’ 8
5.0 How To Create a Voucher Code 12
6.0 How To Create Manual Returns 14
7.0 How To Change Your Password 15
-
How To Log In to OmniReturns Customer Facing Portal Admin
Go to your return portal registered domain (for example https://www.omniparcelreturns.com).
- Click on the login link from the top menu. The Login page will appear.
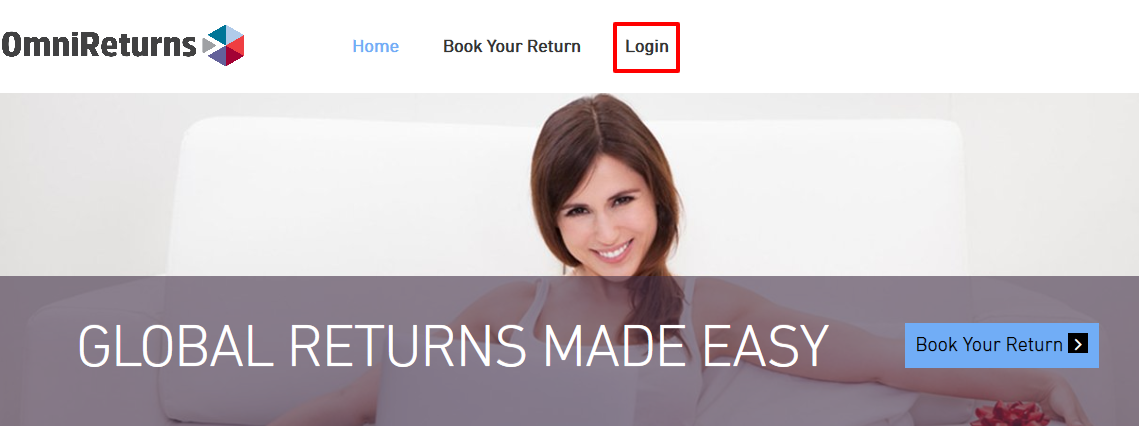 Fig 1.1 Customer Front End
- Type your username and password into the login form.
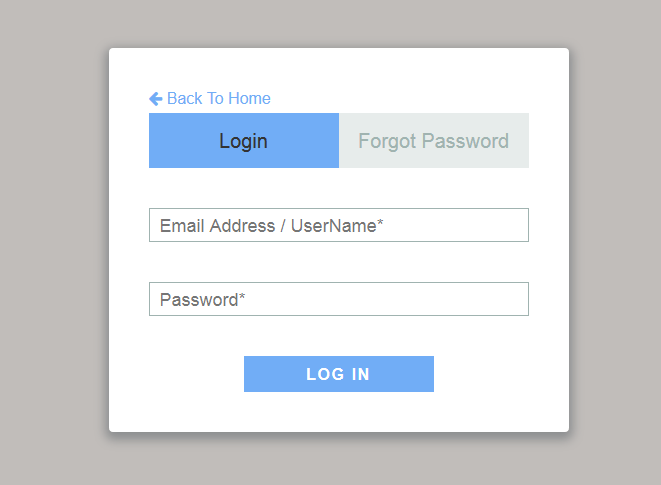
Fig-1.2 Login Form
2.0 Dashboard
Upon logging in you will be presented with your ‘Dashboard’.
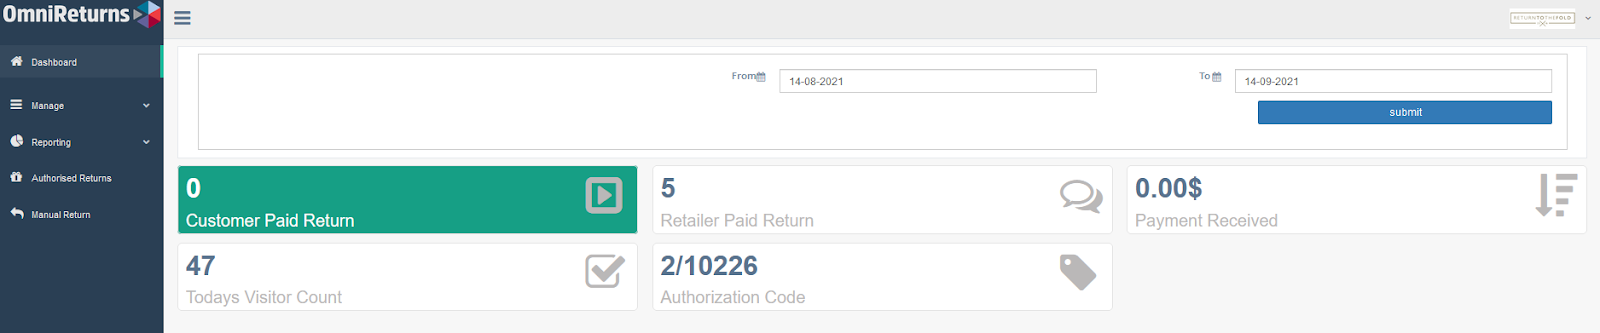
Tab-2.1 Widget Description - Dashboard
All dashboard data displays the records of the last 30 days except today’s visitor count, but if the user would like to change the duration, then they could change by changing the date filter.
|
Information |
Comments |
|
Customer Paid Return |
Will show the number of total customer paid returns only. |
|
Retailer Paid Return |
It will show the number of total retailers paid returns only. |
|
Total Payment Received |
It will show the total payment amount received. |
|
Today's Visitor Count |
Shows the number of customers that have visited your ‘Returns Portal’ for the day |
3.0 User & Retailer Management
User Management
We classify users into two types: Retailer Manager & Retailer Standard.
|
User Type |
Retailer Manager will have access to their retailer admin management page only |
Retailer standard will have access limited functionality/access of retailer page. |
|
Modules |
Retailer Manager |
Retailer Standard User |
|
Authorised Returns |
YES |
YES |
|
User Management |
YES |
NO |
|
Self-Profile Management |
YES |
YES |
|
Reporting |
YES |
NO |
|
Retailer customisation |
YES |
NO |
|
Manual Creation of returns |
YES |
YES |
Tab – 3.1 User Role and Module Access
The Manage – User default screen will display three tabs: 1. View Users 2. Add User 3. User Change log. 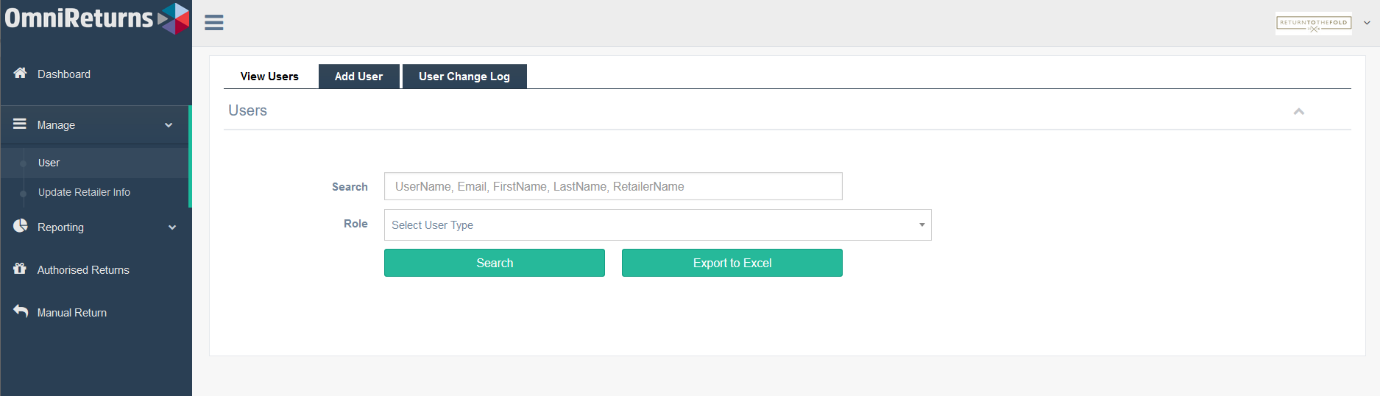
Fig 3.1 Manage – View User: Allows you to search for a user or all users.
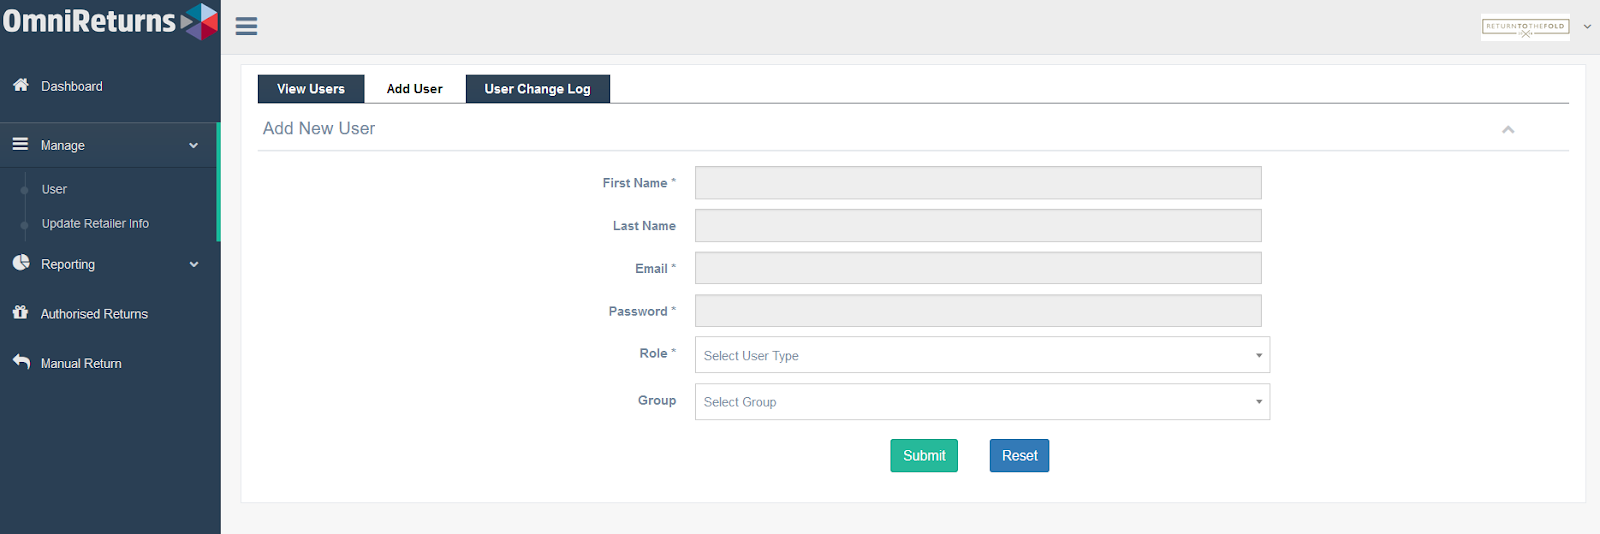
Fig 3.2 Manage - Add User: Allows you to add new users as and when required.
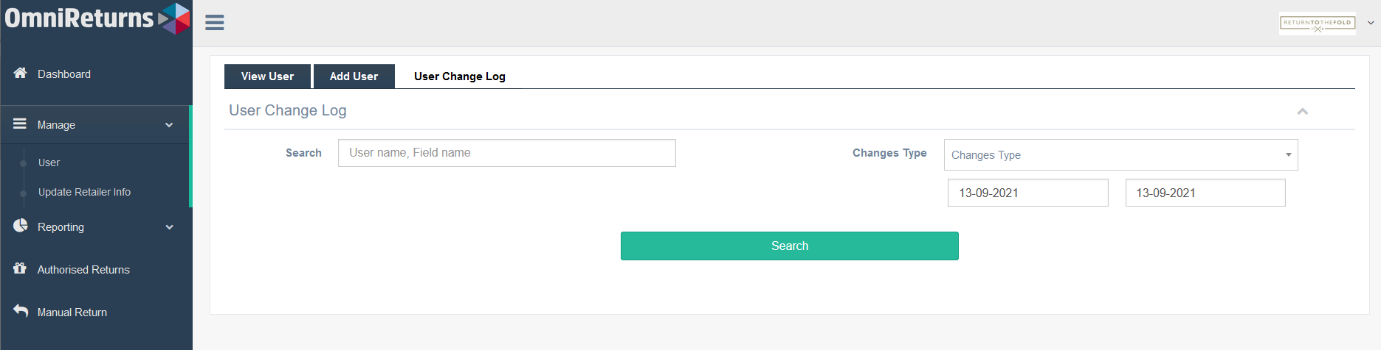
Fig 3.3 Manage - User Change Log: Allows you to see which user has added or made changes.
Update Retailer Info
The Manage – Update Retailer Info screen will display the following: 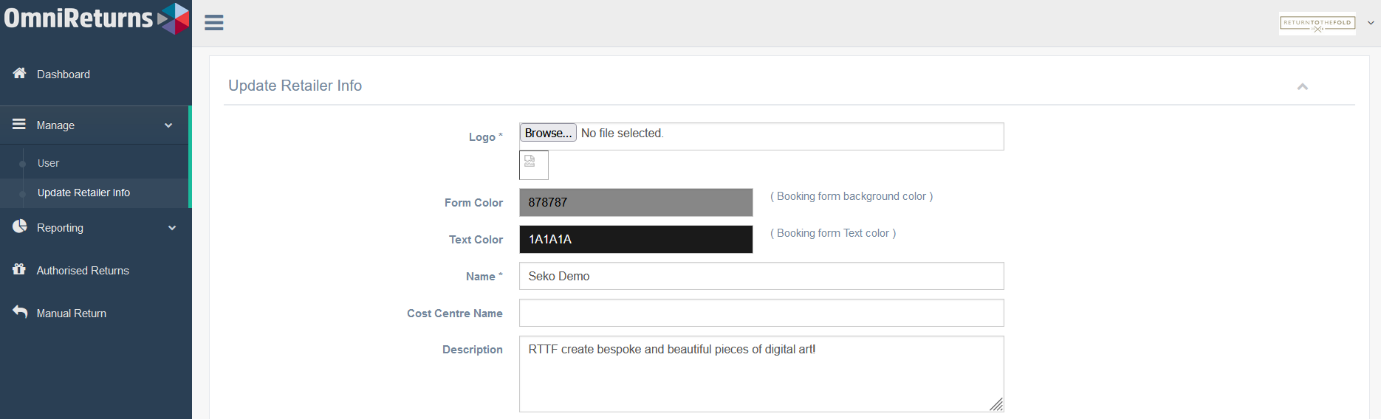
Fig 3.4 Manage – Update Retailer Info Screen
The details in the ‘Update Retailer Info’ section are set during the SEKO onboarding stage. Please use caution when changing any of the settings in this section and contact support: support@omniparcel.com if you have any concerns.
4.0 Reporting & Returns Pending Review
How to Run Reports
- Click on ‘Reporting’ and you will be presented with the Transaction Report’ page.
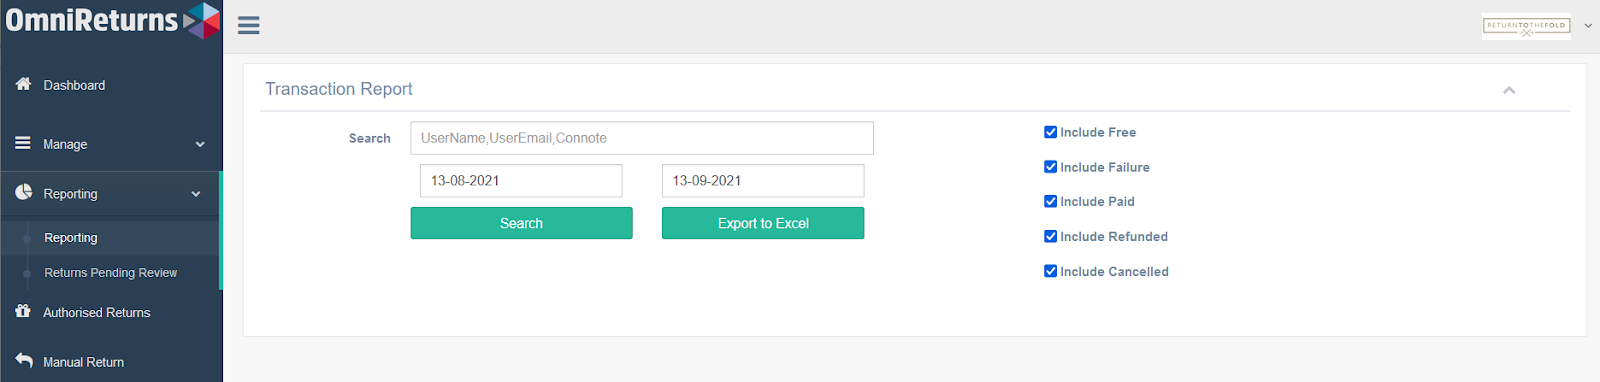
Fig 4.1 Transaction Report Page
- Enter your date range.
- If searching for a specific order, enter the username, email address or return connote number.
- Tick the applicable box/es on the right side of the screen:
- ‘Include Free’ option
- ‘Include Failure’ option
- ‘Include Paid’ option
- ‘Include Refunded’ option
- ‘Include Cancelled’ option
- Click on the search button
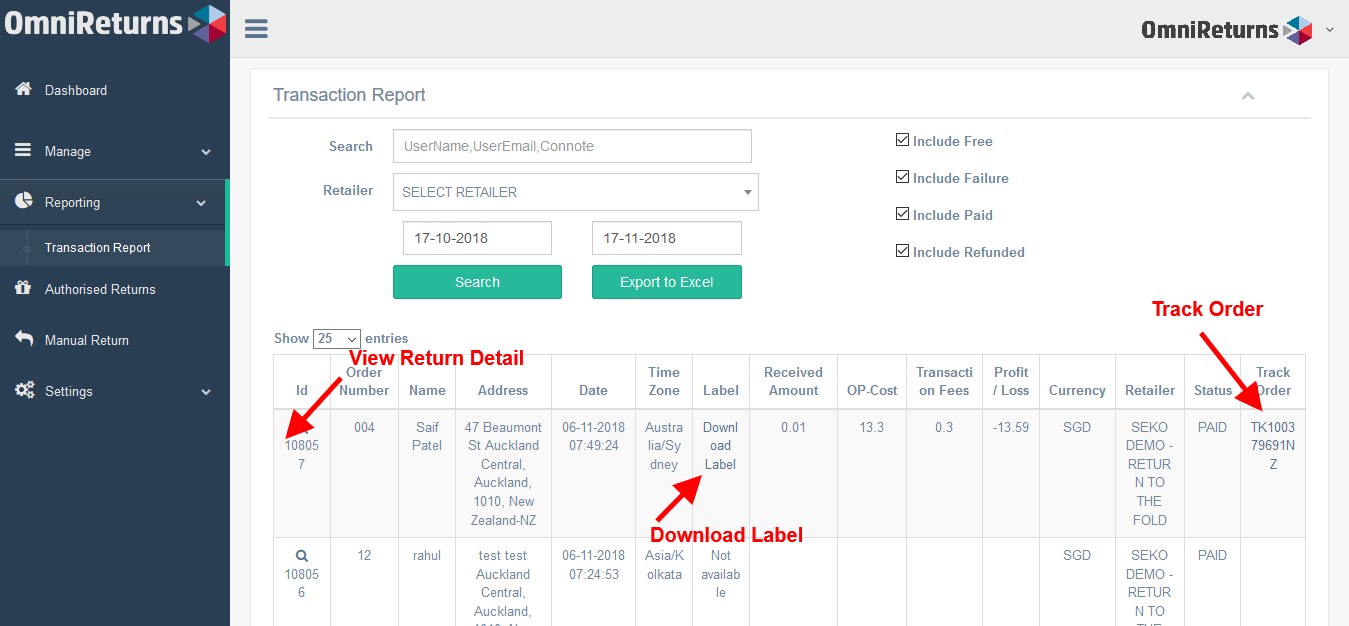
Fig 4.2 Transaction Report
- Reports can now be exported.
- From the above screen you can track the item, download the label, and view other information.
- After clicking on the left side search (Id column) icon, you will be presented with a popup box with complete details of the return (eg. sender details, receiver details, package details, return reason and refund action requested).
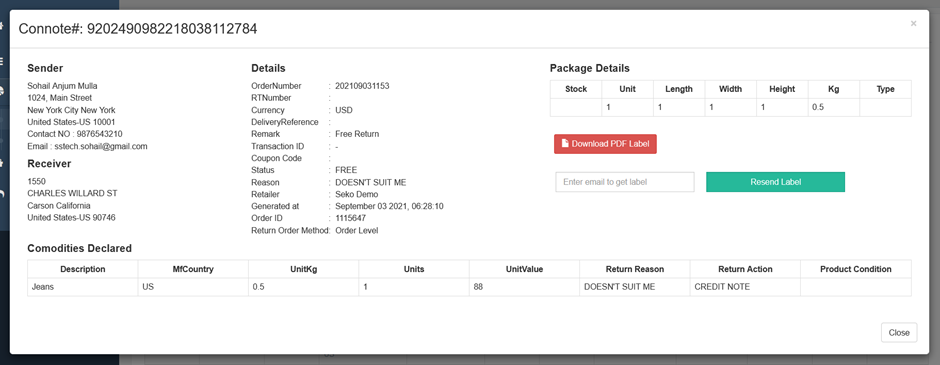
Fig 4.3 – Detailed View of Transaction
- On the popup box shown above, there are two buttons: 1. ‘Download PDF Label’ and ‘Resend Label’. Providing you are using your own Stripe account, you will also have a ‘Refund’ button, allowing you the option to refund money paid by a customer from your account.
How To Process A ‘Return Pending Review’
This is an optional feature allowing your customer service team to review uploaded images of a return (eg. customer submitted faulty returns) and to ‘Accept’ or ‘Reject’ the return. If activated, the list of returns pending review will be displayed on this screen.
- Click on ‘Reporting’ and ‘Returns Pending Review’ on the left side navigation bar.
- To find a specific ‘Return Pending Review’, a ‘Search’ may be conducted using ‘Order Number’, ‘RMA Number’ or ‘Customer Email’.
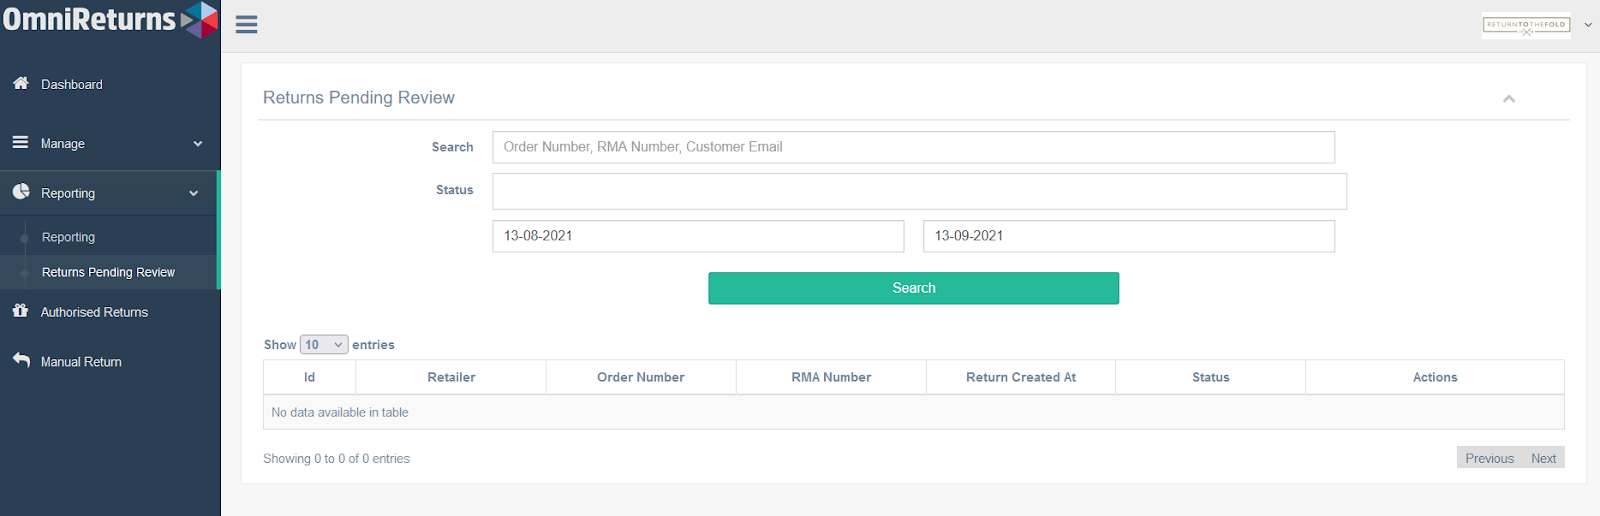
Fig 4.4 – Returns Pending Review Screen
- You may also search by ‘Status’
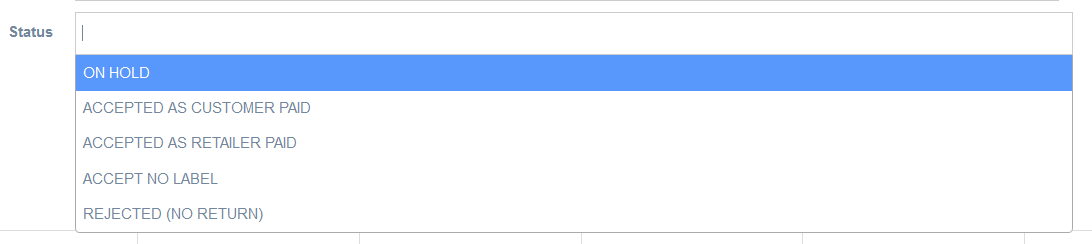
Fig 4.5 – Returns Pending Review – Status Search
To Process a ‘Return Pending Review’ follow the steps below:
- Click on ‘Reporting’ then ‘Returns Pending Review’ tab on the left side navigation bar.
- Enter the applicable date range that you wish to process. Set ‘Status’ to ‘On Hold’.
- The list will display all Returns Pending Review.
- Select a ‘Pending Return’ from the list by clicking on ‘View/Change Review Status’ in the ‘Actions Column’.
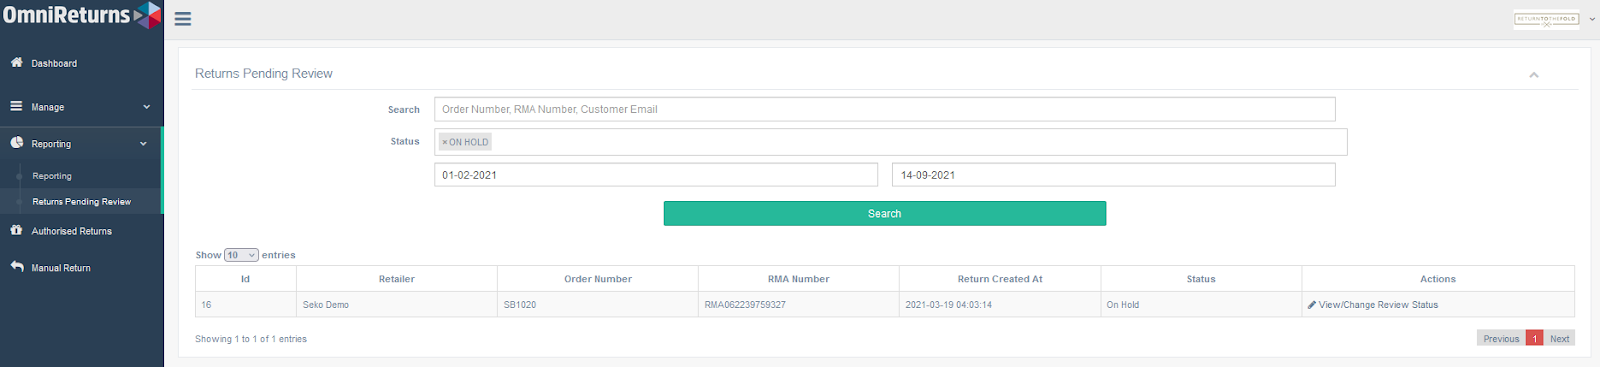
Fig 4.6 – Returns Pending Review – View/Change
You will be directed to the ‘Manage Return Request’ page. The top section provides the Customer details:
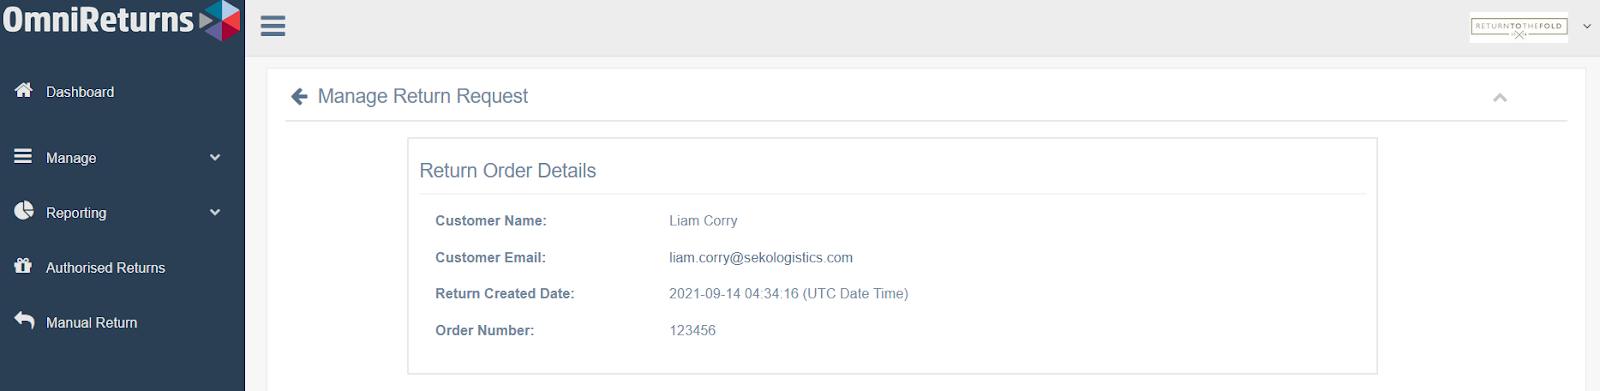
Fig 4.7 – Returns Pending Review – Manage Return Request
The middle section of this page displays the ‘Product Details’ along with the information about the return that the customer has selected. Under the Product details, image links to the customer uploaded images will be provided. To view the image simply click on the link:
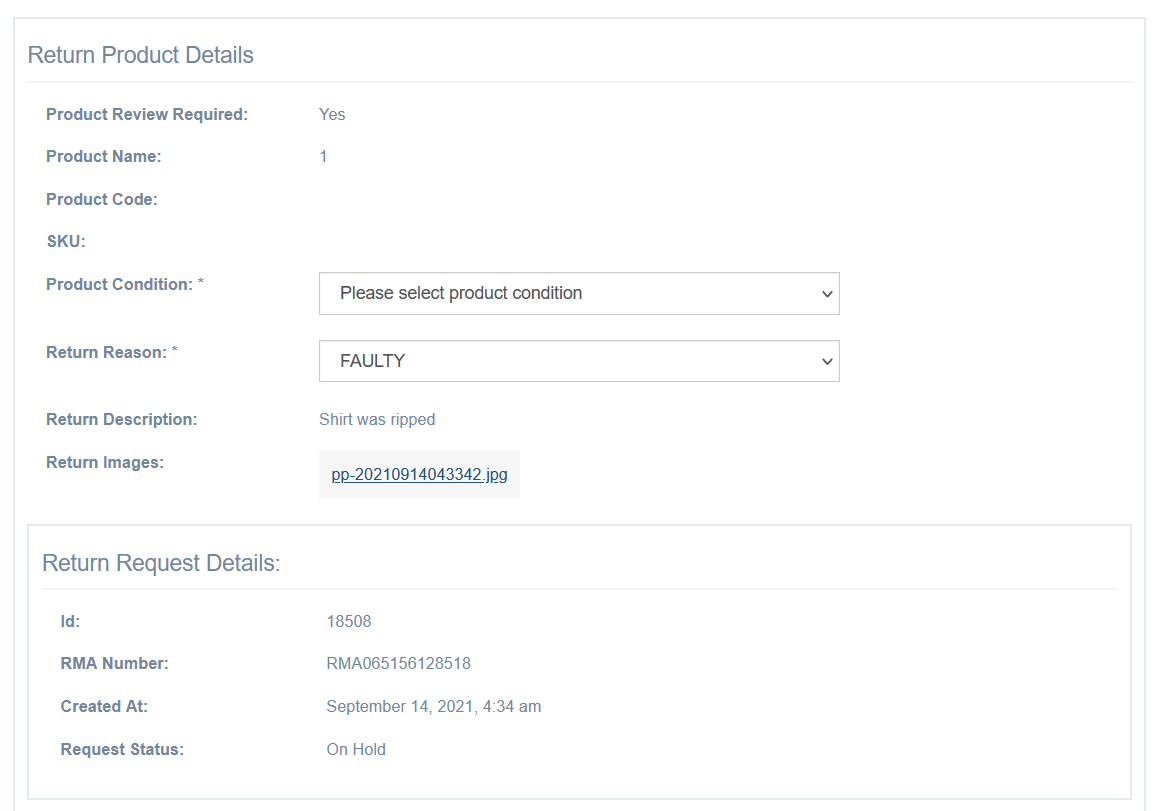
Fig 4.8 – Returns Pending Review – Middle Section
The lower section of the ‘Manage Returns Request’ page displays the required fields required to action the request.
- Enter any required comments about the ‘Return Request’ for others to reference in the future.
- Choose to ‘Accept’ or ‘Reject’ as required.
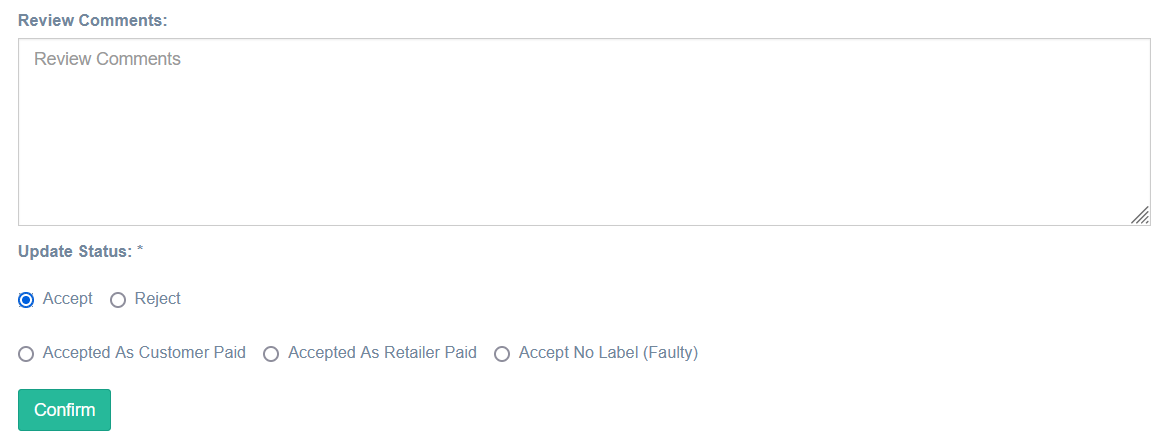
Fig 4.9 – Returns Pending Review – Lower Section
|
Status |
Customer Pays for Label |
Label Created |
Email Sent to Customer |
|
Accept as Paid Label |
Y |
Y |
Y – with a link to pay |
|
Accept as Free Label |
X |
Y |
Y – shipping label email |
|
Accept No Label |
X |
X |
X |
|
Rejected |
X |
X |
X |
Please note, an email is not auto sent to the end customer if ‘Rejected’ or ‘Accept No Label’. In these situations, a customisable email would be necessary.
Your returns portal can be configured to send an email to your selected customer service email address at the time a ‘Return Pending Review’ is created. The email will contain a link to the uploaded images and a ‘Manage’ button, which will link directly to the ‘Manage Return Request’ page shown in Figs. 4.7-4.9
5.0 How To Create a Voucher Code
Voucher codes can be generated and issued to customers, to allow them to create a free return (ie they will not be required to pay for the label). Once issued to the customer, they simply enter the ‘Voucher Code’ into the client facing portal.

Fig 5.1 – Voucher Code
To create a ‘Voucher Code’ please follow the steps below:
- Click on ‘Authorised Returns’ on the left side menu. You will see “Authorised Returns” page with following tabs:
- File Upload
- Generate Free Code(s)
- Free Code(s) List
- Click on the ‘Generate Free Code(s)’ tab.
- Choose the required ‘Hub’ from the drop-down menu or select ‘All’. This field determines where the ‘Voucher Code’ will work. If ‘All’ is selected, the ‘Voucher Code’ will work in all locations.
- Enter the number of vouchers required and click on ‘Generate Autho Code’.

- Now click on the ‘Free Code(s) List’ tab to view the codes.
- Enter the correct date range and press ‘Search’. Your code/s will be displayed. Codes can be exported at any time. Multiple codes can be generated and exported.
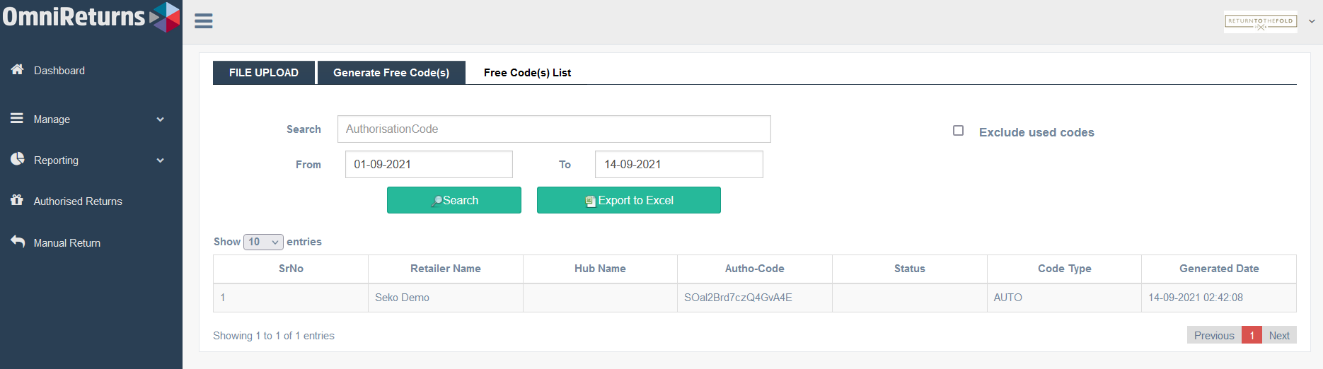
If your own customised codes are required, the ‘File Upload’ option is also available.
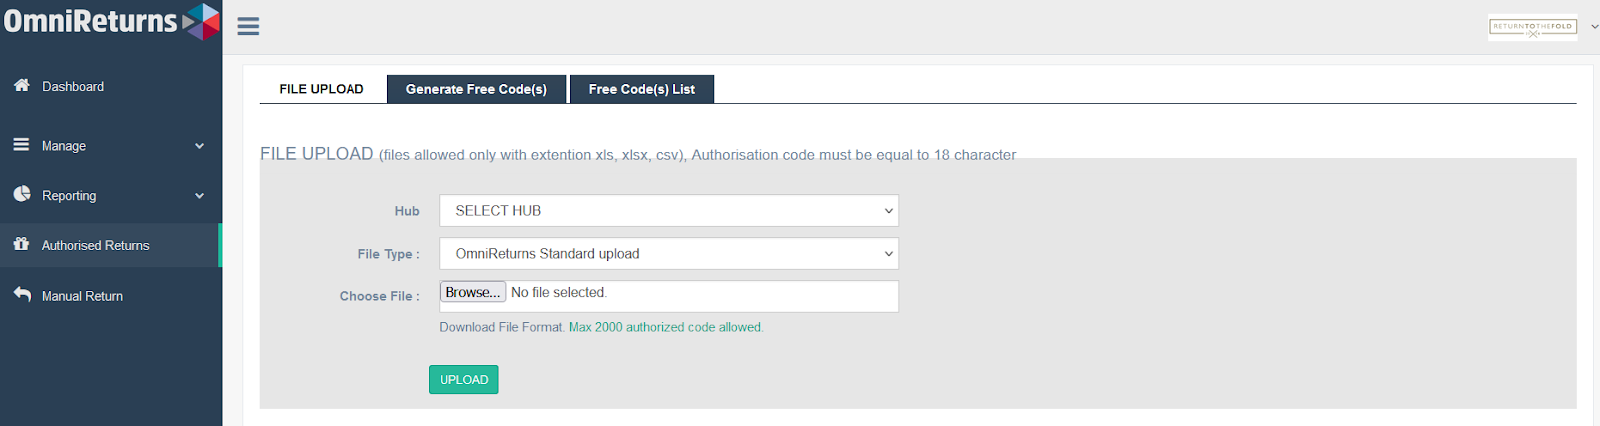
Fig 5.2 – Generating Voucher Codes
- Simply select the ‘’Hub’ from the drop down, ‘Browse’ and ‘Upload’ the selected file.
NOTE: The ‘Voucher Code’ section of the client facing returns portal can be hidden. Please contact your account manager to request this change.
6.0 How To Create Manual Returns
This functionality will be mainly useful for the customer service operator for the occasion when they choose to create a label on behalf of the customer and send that label directly to the customer.
- Enter the customer’s order number and original email address. The original items will populate. If the customers details do not match the original information a manual return will need to be created by filling in all the fields displayed below.
Once the details are submitted an email will be sent to the email address inputted with the returns label.
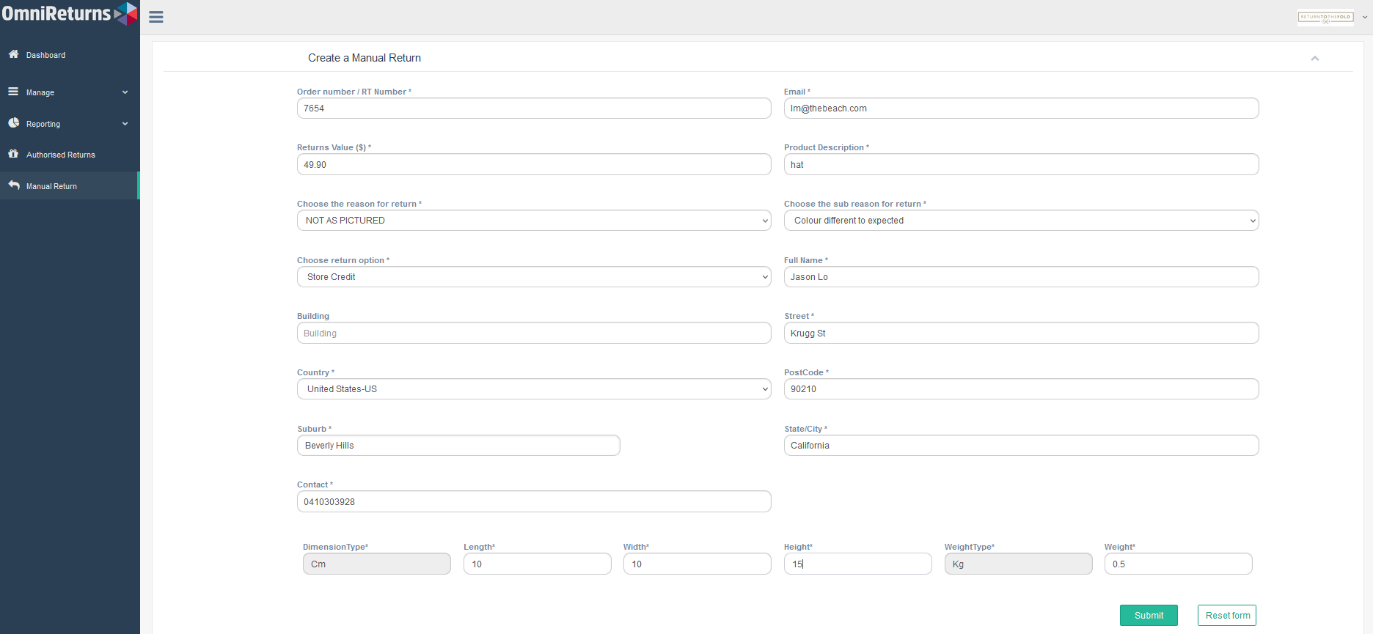
Fig 6.1 Manual Return Creation
Note: Once a returns label has been created it must be scanned by the carrier within 60 days. If 60 days have expired, the label will no longer be valid.
7.0 How To Change Your Password
- Click on right top user icon and select the ‘Profile’ link from drop down box. You will see or update user profile detail.
- Enter your ‘New Password’ and ‘Reconfirm’. Your password will be amended.
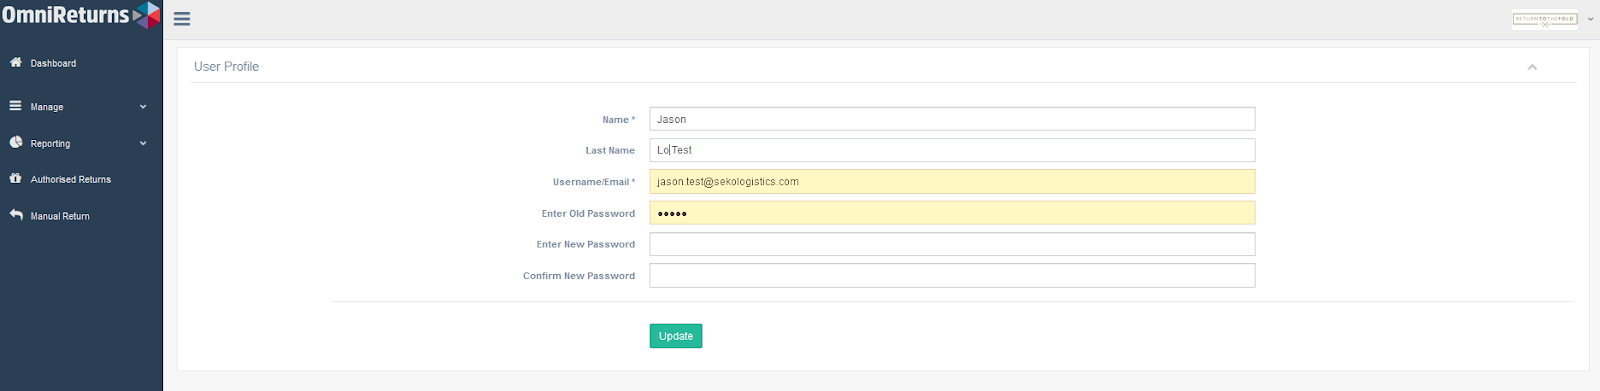
Fig 7.1 – User Profile Edit
SEKOLOGISTICS.COM.AU
Comments
0 comments
Please sign in to leave a comment.